


This is the third part of a seven-part series explaining and setting up a two-tier PKI with Windows Server 2016 in an enterprise SMB setting.
Part 1 (Informational)
Part 2 (Getting Started & IIS Web Server Configuration)
>>> Part 3 (Standalone Offline Root CA Configuration) <<<
Part 4 (Enterprise CA Configuration)
Part 5 (Distributing Certificates & AutoEnrollment)
Part 6 (Additional Configuration)
Part 7 (Troubleshooting & Clean-up)
To help with the layout and navigation of these longer pages, use the Table of Contents below:
Standalone Offline Root CA Setup (RootCA)
At this point, it’s time to install and configure the standalone offline root CA. This server should not be joined to your domain, and should not be connected to the network. However, during the setup, you can probably get away with having a network connection to make life easier. This of course depends on your environment and company policy, and if you choose to do so, take caution. After the CA’s are set up and configured, then obviously you would take it off the network and turn it off, never allowing it on any network again.
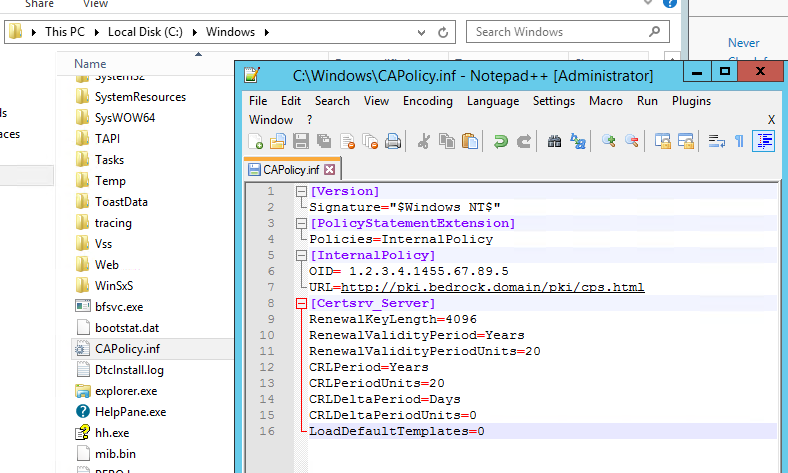
Create CAPolicy.inf
The CAPolicy.inf file tells the server how to configure itself when the Certificate Services role is installed. If you install the role first, some of those settings will be set to their defaults, which you can’t change afterwards. So it’s important to configure this file and save it to your C:\Windows directory before you install the Certificate Services role.
You need to create this file in C:\Windows\CAPolicy.inf –BEFORE– you install the Certificate Services role.
- On RootCA, copy and paste this into notepad, and save it as C:\Windows\CAPolicy.inf
[Version]
Signature="$Windows NT$"
[PolicyStatementExtension]
Policies=InternalPolicy
[InternalPolicy]
OID= 1.2.3.4.1455.67.89.5
URL=http://pki.bedrock.domain/pki/cps.html
[Certsrv_Server]
RenewalKeyLength=4096
RenewalValidityPeriod=Years
RenewalValidityPeriodUnits=20
CRLPeriod=Years
CRLPeriodUnits=20
CRLDeltaPeriod=Days
CRLDeltaPeriodUnits=0
LoadDefaultTemplates=0
- The OID should be changed to your own organizations OID, as the one listed is the Microsoft OID. See this MSDN article here: (http://msdn.microsoft.com/library/windows/desktop/ms677621.aspx)
- You can add your own “cps.html” link, even if it’s a blank html, you can change the contents of the file later.
- If your environment allows, 20 years for Certs and CRLs for the Offline Root CA is convenient. This way, you only need to turn on the Offline Root CA as described in Part 1. Delta CRLs will be off.
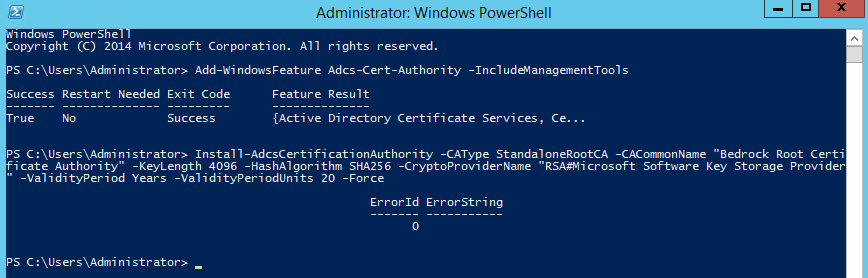
Install Certificate Services
On your to-be Root CA server (RootCA), install the Active Directory Certificate Services role.
- To install the AD CS role, in PowerShell, enter the following:
Add-WindowsFeature Adcs-Cert-Authority -IncludeManagementTools
- After the role is finished installing, you must configure it. Enter the following in PowerShell, changing the options as needed to fit your environment. The options are described below:
Install-AdcsCertificationAuthority -CAType StandaloneRootCA -CACommonName "Bedrock Root Certificate Authority" -KeyLength 4096 -HashAlgorithm SHA256 -CryptoProviderName "RSA#Microsoft Software Key Storage Provider" -ValidityPeriod Years -ValidityPeriodUnits 20 -Force
- CACommonName: This is what will show on all certificates and can be seen publicly. Change it to something that better fits your environment.
- KeyLength: Verify that your hardware is capable of 4096, such as smart cards, smart card readers, phones, and other devices. If not, use 2048.
- HashAlgorithm: If you can use SHA256, do that. If not, you can use SHA1, which is less secure.
- CryptoProviderName: The CSP or KSP used. Keep this as it is unless you have a specific reason to use anything else. You will know if you need to.
- ValidityPeriod: The length of time (days, weeks, months, years), in this case, the RootCA’s certificate will be valid.
- ValidityPeriodUnits: The actual length of time the RootCA’s certificate will be valid, until you must manually renew it. Generally, you can set this high, such as 20 years. The RootCA will be turned off and secured, so there isn’t really a reason to set it lower, unless you want to reevaluate the certificate properties sooner and feel you may want to make changes. Plan for that now… perhaps SHA256 will be compromised in 10 years, and you’ll want to switch to SHA512. Perhaps not, but you get my point.
- The result should look like this:
Post-Install Configuration
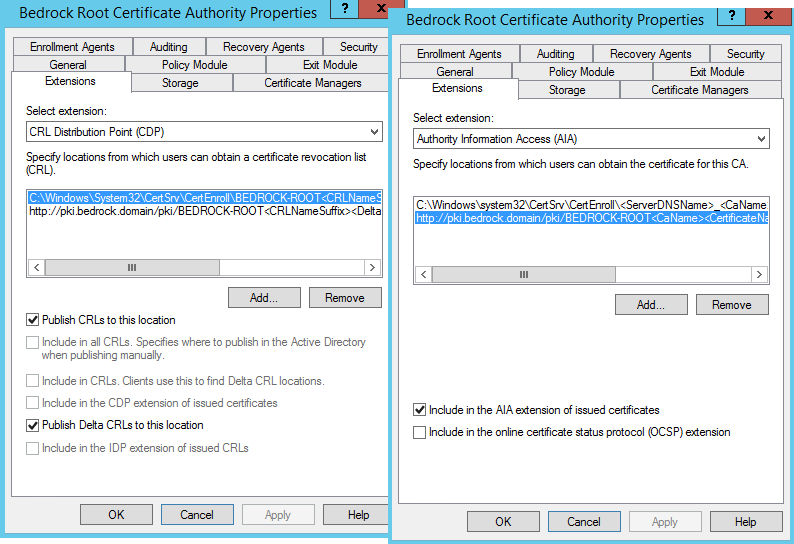
Now that the AD CS role is installed on the RootCA server, and now has it’s own certificate, the next steps include changing the default AIA and CDP settings, as well as configuring how the RootCA functions and issues certificates to the subordinate CA(s). In this case specifically, how the RootCA server will issue a certificate to the issuingCA server. Then we’ll need to copy the .crt and .crl files over to WebServ1 and issuingCA. Once copied over, you will need to rename the .crt file appropriately, to what the AIA url is looking for.
The Script
The following PowerShell script does most of the above. Edit as needed. The script and options are explained below. Use the copy button below to copy all the text to clipboard:
$crllist = Get-CACrlDistributionPoint; foreach ($crl in $crllist) {Remove-CACrlDistributionPoint $crl.uri -Force};
Add-CACRLDistributionPoint -Uri C:\Windows\System32\CertSrv\CertEnroll\BEDROCK-ROOT%8%9.crl -PublishToServer -PublishDeltaToServer -Force
Add-CACRLDistributionPoint -Uri http://pki.bedrock.domain/pki/BEDROCK-ROOT%8%9.crl -AddToCertificateCDP -AddToFreshestCrl -Force
Get-CAAuthorityInformationAccess | where {$_.Uri -like '*ldap*' -or $_.Uri -like '*http*' -or $_.Uri -like '*file*'} | Remove-CAAuthorityInformationAccess -Force
Add-CAAuthorityInformationAccess -AddToCertificateAia http://pki.bedrock.domain/pki/BEDROCK-ROOT%3%4.crt -Force
certutil.exe –setreg CA\CRLPeriodUnits 20
certutil.exe –setreg CA\CRLPeriod “Years”
certutil.exe –setreg CA\CRLOverlapPeriodUnits 3
certutil.exe –setreg CA\CRLOverlapPeriod “Weeks”
certutil.exe –setreg CA\ValidityPeriodUnits 10
certutil.exe –setreg CA\ValidityPeriod “Years”
certutil.exe -setreg CA\AuditFilter 127
Restart-Service certsvc
- The first line gets all of the CDP paths, and deletes them. They are all no good.
- Line 2 adds back the default Windows system required CDP with a better name.
- Line 3 adds the URL of the CRL that will be on all issued certificates. This needs to be a highly-available publicly accessible URL. Typing in this URL should prompt your internet browser to download the .crl.
- The 4th line gets all of the AIA paths (but not the default Windows system path) and deletes them. They are also no good.
- Line 5 adds the URL of the AIA file that is on all issued certificates. This also needs to be a highly-available publicly accessible URL.
If those first 5 lines are done correctly, you should end up with something like this in your CA Properties. You can get there through the Certificate Authority management console via Server Manager. I’ll explain the rest of the lines from above, below:
- Line 6 sets the CRL time period to 20 (time period indicated below).
- Line 7 sets the above 20 (in line 6) to years.
- You can change those, but being that this is an offline root CA, and it’s unlikely you’ll be doing a lot of certificate revocations of your issuing CA(s), you can set this high. If you do revoke or renew a 2nd Tier CA’s certificate, you can simply renew the RootCA’s CRL and copy it to the WebServ1 location.
- Line 8 sets the overlap period between the CRL and the Delta CRL. The overlap period for CRLs is the amount of time at the end of a published CRL’s lifetime that a client can use to obtain a new CRL before the old CRL is considered unusable.
- Line 9 sets the above CRL Overlap Period to days, weeks, months, or years.
- Line 10 sets the maximum certificate validity period of certificates issued by this CA. This should be high enough to accommodate the length of time you want tier 2 CA certificates to be valid. I want, in this case, my tier 2 issuingCA’s certificate to be valid for 10 years, and this CA will be issuing the certificate to the issuingCA, so I am setting this to 10 years. This is just the maximum, not what it WILL issue for. You could set this to 50, and still issue a certificate for 10 years.
- Line 11 sets the above validity period to days, weeks, months, or years.
- Line 12 sets the audit filter to 127, which turns on the audition of all auditing events. Note, that you will also need to assign a group policy to enable Audit Object Access for Success and/or Failure as required in order for any certificate services events to be logged.
- The last line restarts the certificate services, which is required after the above changes.
Publish New CRLs
After the above configurations are complete, you must publish new CRLs, which will take into account all of the changes you’ve just made.
- Enter the following in PowerShell:
certutil -crl
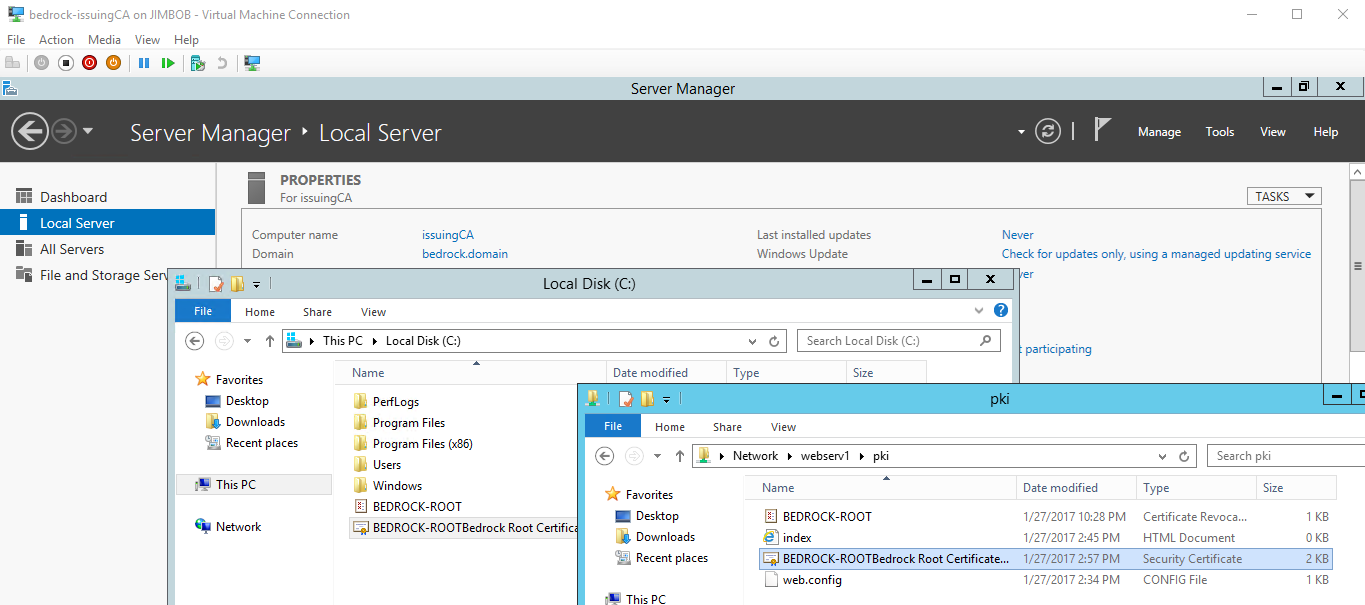
Copy the CRT and CRL files
The last step in this part is to copy the .CRT and .CRL files to the other two servers. To the subordinate CA (issuingCA) and the web server (WebServ1).
- The .CRT file is located at: “C:\Windows\System32\CertSrv\CertEnroll\RootCA_Bedrock Root Certificate Authority.crt”
- First rename the above file to: “BEDROCK-ROOTBedrock Root Certificate Authority.crt”
- This is what the certificates will be looking for. Edit appropriately for your environment.
- Copy the .CRT file to the pki folder you created on the web server (WebServ1): \\webserv1\pki
- You also need to copy the .CRT file to the C: drive on the subordinate CA (issuingCA). This is easier if it’s already on the network, or if deploying these on virtual machines, you can copy it from your admin PC and paste it in the issuingCA vm if you have Enhanced Session Mode enabled.
- First rename the above file to: “BEDROCK-ROOTBedrock Root Certificate Authority.crt”
- The .CRL file is located at: “C:\Windows\System32\CertSrv\CertEnroll\BEDROCK-ROOT.crl”
- Do *note* that you will have a second .crl file in there, which is the old one originally created when you installed the CA role. You can ignore that one.
- Copy the .CRL file to the pki folder you created on the web server (WebServ1): \\webserv1\pki
- As with the the .crt file, you will also need to copy the .CRL file to the C: drive of the issuingCA. We need it there for a later step.
On the server named issuingCA, this is what you should end up with after renaming and copying over the above files:
Next Steps
The root CA (RootCA) is now completely configured. The next steps are to, on the issuingCA server, publish the root .CRT and CRL to Active Directory and local cert store, install CA role and service, issue a certificate to issuingCA, and do the configuration. This will be covered in the next part, Part 4.
Hi,
How we can make the Key Usage as Critical field in Root and Issuing CA ?
Will there be an issue if the RenewalKeyLength in CAPolicy is different from the one set in the initial configuration of AD certificate service? (CAPolicy.inf already set before ADCS installation)
If yes, can I edit the CAPolicy to be patterned with the KeyLength of ADCS?
TIA
Very good tutorial.
Dont mean to be rude but do you still plan on finishing it? An ETA maybe? (been waiting for the complete one since 04/2018) 🙂
One question I have… why does the root ca create certificates with different file names? (can’t the renaming process pe excluded by having the correct name in the first place?)
Thank you very much! This is great documentation. Quick question: does the name of the .crt file in the pki folder need to match the name of the one in the Windows directory? I’d like to rename the file to RootCA.crt instead of _RootCA.crt.
It’s wise not to add a Policy OID to a Root CA. If you do so, you’re tying yourself for the lifetime of the CA, which in this case is 20 years, to that Policy OID (or mutliple OIDs if you’re forward looking and add a few). Rather, if you insists on adding Policy OIDs (and you have to ask yourself why) you should add it/them to either a Policy CAs (three tier in MS parlance) or even to the Issuing CAs. At least that way you can add more OIDs at a later date by adding subordinate CAs. Bear in mind that nothing checks Policy OIDs (the odd networking device can be configured to do so), so unless you have a justifiable reason to add them which can bring measurable benefit to your organisation, why bother? Presumably, if you are adding OIDs, you have fully documented them in your Certificate Policy document?
Gareth did you ever get your anwser on this? I am looking to carry out a 2 tier pki deployment in my organisation and reading around the subject I’m under the same impression that the OID is not required for the offline Root CA (capolicy.inf file).
https://www.sysadmins.lv/blog-en/certificate-policies-extension-all-you-should-know-part-1.aspx
Thanks
Why do you rename the crt file to “BEDROCK-ROOTBedrock Root Certificate Authority.crt?” Can you rename it to anything you want?
This is the name that the certificates will be looking for based on the name in the CDP “Extensions” tab.
I’m curious why you are adding BEDROCK-ROOT%8%9?
Why not just use
I was wondering that myself. However it is nicely explained here: https://www.sysadmins.lv/projects/pspki/Add-CRLDistributionPoint.aspx
Hi,
We have got a PEN number by OID (1.3.6.1.4.1.51824) from IANA. Can I use this OID in the file “CAPolicy.inf” for Offline Root CA?
Please let me know
Yes you can.
I Need every day a new CRL (Next Publish), but an expiration of 30 days (Next Update). Why exist the rule min(CRLPeriodUnits , CRLOverlapPeriodUnits )? It makes sense to refresh the CRL at a short period, but the expiration should be higher.
certutil.exe –setreg CA\CRLPeriodUnits 1
certutil.exe –setreg CA\CRLPeriod “Days”
certutil.exe –setreg CA\CRLOverlapPeriodUnits 29
certutil.exe –setreg CA\CRLOverlapPeriod “Days”
Hi Tim,
Unlike other CAPolicy.inf files you used “CRLPeriod=Years” instead of “weeks”. Is it intentionally or just a typo?
Does the PowerShell script work locally on the server or is it domain wide?
It’s to be ran locally on the server.
I’m curious about the AIA section above. You issue a PS cmd to remove all address and then only issue a single Add-CAAuthorityInformationAccess -addtocertificateaia that puts your https address in there, but the picture you have shows the default address as well. Does the AIA need both or just the one?
The command:
Get-CAAuthorityInformationAccess | where {$_.Uri -like ‘*ldap*’ -or $_.Uri -like ‘*http*’ -or $_.Uri -like ‘*file*’} | Remove-CAAuthorityInformationAccess -Force
…removes all AIA paths except the default internal path in system32. Then I add my own http path. You want to leave that one in there, and add your own http address.
I used the default Microsoft OID in my CAPolicy.inf. I have now registered for my own. In addition, I see other changes I need to make. For example, I see that my CA Properties look screwy. In the Extensions tab I have http://pki.mydomain/CertEnroll/etc… Can I make these changes and then renew my subordinate certs? Thanks a bunch for your posts.
Hello SOMETECHSTUFF,
I am a little hung up on the OID in the CAPolicy.inf. Did using the Microsoft OID work for your installation? If so, what advantage did registering for your own OID provide?
I found this link in another forum that states they were able to get an OID for free, vs the ANSI fees of thousands of dollars.
TIA
ToMTech
Yes please, I am a bit hung up by that piece too. Is it required to have our own OID, or will MS one work?
You can use the Microsoft OID. However, if you need your PKI to work across multiple organizations then these organizations will need different OIDs. You can get a unique OID for free at http://pen.iana.org/pen/PenApplication.page
They will register you in a public database and send you a PEN. The PEN can be used as your OID in the following format.
1.3.6.1.4.1.[PEN]
I hope this helps.
Very through instruction. We’re also working on a similar guide but with a dedicated credential management system with a HSM to secure CA keys.
One of the debates I’ve seen on the web is whether it’s mandatory to create a CAPolicy.inf file before the CA installation. I believe that this used to be the case, but since Windows 2008 server, it’s optional and a server will create it for you during the CA configuration. What additional benefits do you gain by creating this file in advance?
Yes it is best practice to create and configure the CAPolicy.inf file before you install the CA. It is not required to install a CA with default settings, but the default settings during installation may not be sufficient in many cases. This is why the CAPolicy.inf file should be created prior to installation.