


This is the second part of a seven-part series explaining and setting up a two-tier PKI with Windows Server 2016 in an enterprise SMB setting.
Part 1 (Informational)
>>> Part 2 (Getting Started & IIS Web Server Configuration) <<<
Part 3 (Standalone Offline Root CA Configuration)
Part 4 (Enterprise CA Configuration)
Part 5 (Distributing Certificates & AutoEnrollment)
Part 6 (Additional Configuration)
Part 7 (Troubleshooting & Clean-up)
To help with the layout and navigation of these longer pages, use the Table of Contents below:
Preface
In part 2, we will begin by setting up the three servers needed to run the PKI. I will assume that you already have a hypervisor running Hyper-V, VMWare, KVM, etc., and already have three fresh Windows Server 2016 servers up and running.
In my examples, I will be using a test domain named “bedrock.domain”. Obviously, there is no way to use bedrock.domain or even bedrock.com publicly, but I will use the appropriate public facing URLs as it should be done in a real production environment. All you need to do, is replace “bedrock.domain” and “bedrock.com” with your own appropriately. There should be no issues provided you have DNS set up correctly both on-prem and publicly.
There are additional steps to take and additional configurations we must perform on the IIS server (WebServ1), but we can’t do these until the RootCA and EnterpriseCA are set up and configured.
Basic Server Setup
Set up the following servers. You can use your own naming scheme, replace everywhere appropriately:
- Server 1 (this will be the Standalone Offline Root CA)
- Name: RootCA
- Domain: Do NOT join to domain.
- Server 2 (this will be the Enterprise CA (or issuing / subordinate CA))
- Name: issuingCA
- Domain: bedrock.domain (join this server to your domain)
- Server 3 (this will be the IIS server)
- Name: WebServ1
- Domain: bedrock.domain (join this server to your domain)
- Drives: (C: OS Drive) and (D: Data Drive). The D: drive is where we’ll create the “pki” share.
Web Server Setup (WebServ1)
First we need to get the IIS server (WebServ1) ready, so that when we configure the Root CA and Enterprise CA, there are no issues or delays. I’m assuming you have already named it appropriately, joined the domain, set up another virtual disk – added it as the (D:) drive, and formatted it as an NTFS volume.
Install IIS
IIS needs to be installed if you haven’t done so already. The defaults will do fine:
- On WebServ1, in Server Manager, click Add roles and features.
- On the Server Roles page, select Web Server (IIS), in the pop-up, click the Add Features button, then click Next.
- Click next until the end, then click Install.
Create Share
We need to create a share that will be the main CRL Distribution Point and AIA publication spot. The idea here, is that the CRL and AIA url’s on all certificates will point here from the internet. So this means we’ll soon need to add the appropriate DNS records internally to point here in an external manner. I’ll explain that later. If this place isn’t accessible externally or publicly, you can still copy the CRL and AIA files to the web server location that is accessible publicly. More on this later as well.
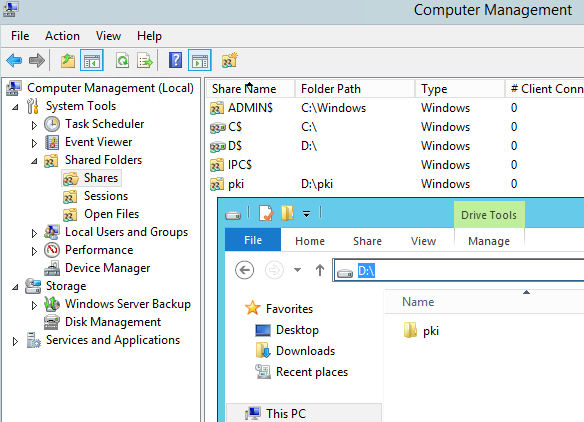
- On WebServ1, create a folder on the D: drive named “pki”. The path should be: D:\pki
- Open Computer Management (compmgmt.msc).
- Under “Shared Folders”, right-click Shares and select “New Share“. Click Next.
- Browse to the pki folder you created, then click Next.

- Leave the share name as pki, and change the offline setting to: “No files or programs from the shared folder are available offline”. Click next.
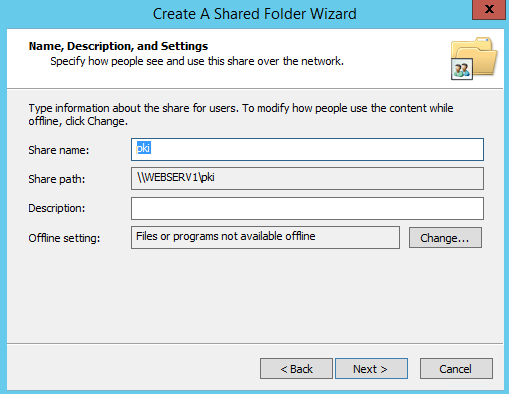
- Click Customize permissions.
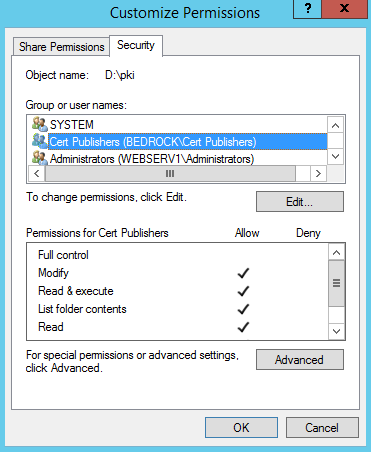
- On the “Share Permissions” tab, add “Cert Publishers” and allow “change” permissions.

- On the “Security” tab, click the Edit button and Add “Cert Publishers”. Check “Modify” permissions.
- On the “Share Permissions” tab, add “Cert Publishers” and allow “change” permissions.
- Click OK, then click Finish out of both windows.
- Browse to the pki folder you created, then click Next.
- You should now have a share named “pki” with a folder path of “D:\pki”, and the “Cert Publishers” group should have change share permissions and modify ntfs permissions.
- Go ahead and create a blank index.html file in the D:\pki\index.html directory.
- Also create a blank cps.html file in D:\pki\cps.html directory.
Create IIS Virtual Directory
Now we need to create the “pki” virtual directory in IIS. This will point the D:\pki folder to http://WebServ1.bedrock.domain/pki.
- On WebServ1, in IIS Manager, right-click on “Default Web Site” and select “Add Virtual Directory“.
- Type pki as the “Alias:“, and D:\pki as “Physical path:“. Then click OK.

- Type pki as the “Alias:“, and D:\pki as “Physical path:“. Then click OK.
- Click to select pki on the left under Default Web Site, then double-click “Directory Browsing” on the right.
- On the right, click “Enable” to enable Directory Browsing.
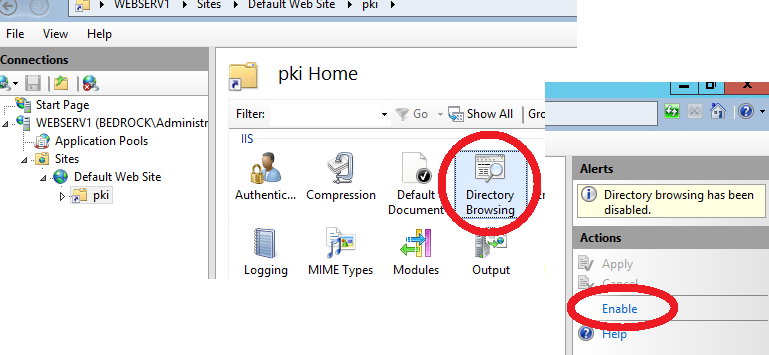
- On the right, click “Enable” to enable Directory Browsing.
Enable Double Escaping
Because Delta CRL files have a plus symbol after them, we need to enable Double Escaping on the IIS server so that requests for the Delta CRLs are not blocked.
*Note:* This may now be enabled by default.
- On WebServ1, in IIS Manager, click the pki virtual directory, then double-click Request Filtering.
- In the actions pane, click Edit Feature Settings.
- Select the Allow double escaping check box, then click OK.
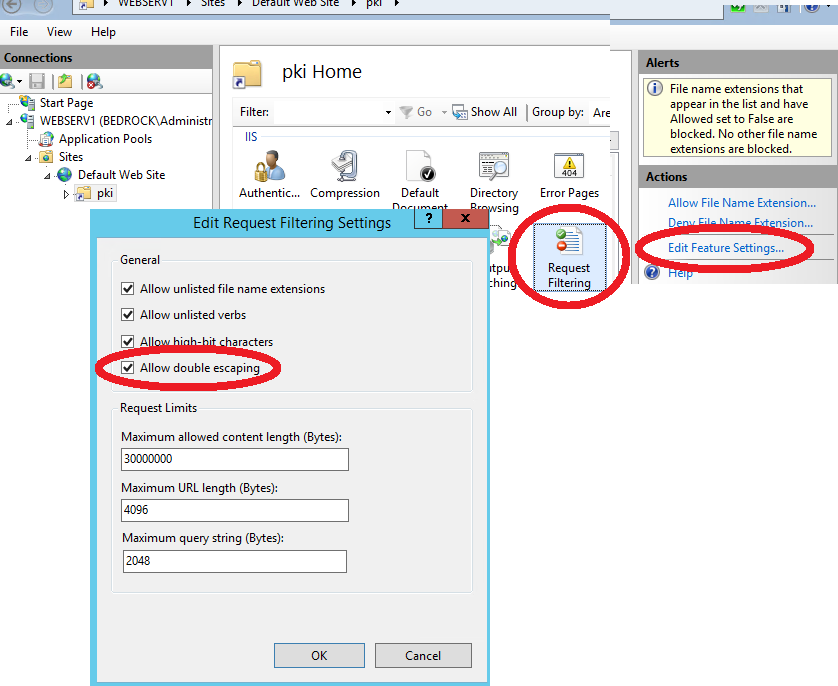
- Alternatively, you may use the below method:
- Open up a command prompt, then change directory to: %windir%\system32\inetsrv\
- Then type the following: Appcmd set config “Default Web Site” /section:system.webServer/Security/requestFiltering -allowDoubleEscaping:True
Create CNAME
You should create a “pki“ CNAME on your DNS server pointing to your web server (WebServ1). This will allow you to use http://pki.bedrock.domain/pki and get you to that pki folder you created. You should also do this on any external or public DNS as well. If you have a domain that isn’t public, such as bedrock.domain, you would add this DNS record in your bedrock.com forward lookup zone. You can create a CNAME DNS record pointing to any server. In this case, you will create a CNAME named “pki” that points to your IIS server.
- On your DNS server, Open up DNS Management, and browse to your bedrock.domain forward lookup zone.
- Right-click on your version of bedrock.domain forward lookup zone, then click New Alias (CNAME).
- In the New Resource Record window, type pki in the “Alias name” field, and then type webserv1.bedrock.domain. in the “Fully qualified…” field. You need to include the trailing period. Then click OK.
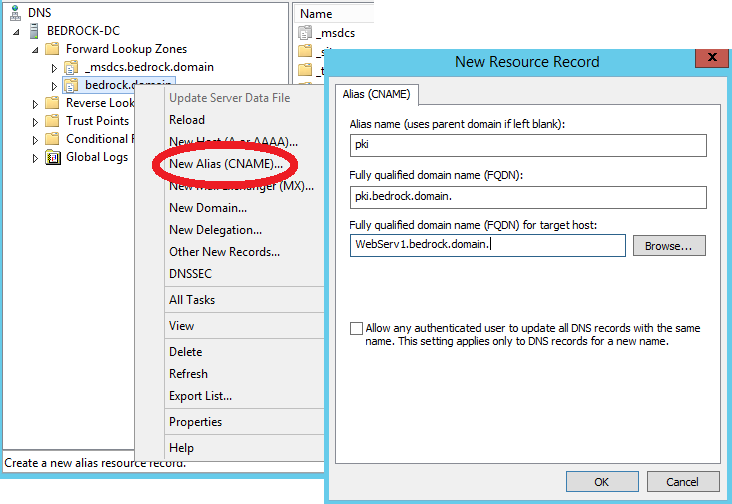
- If you have a bedrock.com forward lookup zone, do the same thing there.
Additional Configuration
There are still some more configurations to be done on this web server, but we can’t do those until the RootCA and EnterpriseCA are set up and configured. For example, we can’t set up “CertSrv” on here yet, because that requires an Enterprise (subordinate issuing) CA.
These things will be configured in later parts of this series.
if you did not join this computer to the domain, howto get the login Administrator@BEDROCK and the group cert publisher@BEDROCK ??!! this looks like confusing the configuration process, and after this howto publish certs from Domain Member to standalone Web and Share should be another challange in your documentation ?!?
In this implementation only the Root Certificate Authority is standalone.
The SC and Web server must be domain joined.
Hi Timothy,
If I’d like to reduce the number of servers, what would you recommend without sacrificing security and flexibility? I have an environment with Windows 2016 Active Directory Infrastructure with multiple sites, in which each site has direct internet access. Each site connected thru IPSec tunnel to form an enterprise connectivity.
I have a DMZ zone where I need to publish some app server in the future but for now, I mainly want to connect the ADFS-proxy (in DMZ) to Office365. I will have also internal ADFS Server, which require CA setup for it. What’s the minimum number of servers is required to build a proper PKI/CA infrastructure? I can understand we need a standalone root CA but the issuing CA server , Enterprise CA server, and IIS server, can they reside on the server? What’s the pluses and minuses in doing so?
As I mentioned above, at the DMZ, I am planning to put my ADFS-proxy server so I can connect to the Office 365 as well to allow https to connect to my Exchange Server (in the inside network) for mobile users — activesync, owa, etc. My question, do we need a 3rd party CA such as Entrust? If yes, where do I install it, on the ADFS-proxy server in the Cisco ASA firewall ? What time of 3rd party certificate should I get, wildcard certificate or individual server cert? Remember, I will have more services offered accessible thru the public network.
Thank you
Hi,
I would never recommend having an on-line root CA in a production environment, but you can combine the Enterprise or Subordinate CA and the IIS server just fine, especially if there isn’t a ton of traffic.
All clients will need to see a valid and trusted “Service Communication Certificate” on your ADFS server… meaning from a 3rd party like Let’s Encrypt. You can still use your internal certificates for the “Token Decrypting” and “Token Signing Certificate”. Those are separate from the Service Communication certificate.
Good job on instructions! Our internal domain is different from the outside domain (Long story) will this cause any issues with the web server?
Thanks
No. My current environment is the same way. Outside domain is .com, internal is .local. If you host the CRLs and all that on the external webserver and have your certs use that, it’ll work out as normal.