


When you deploy a server that is not behind extra security layers such as those in front of a VPS on Google’s Cloud Platform (GCP), there are quite a few steps you need to take to harden your server in the context of security. These should be done no matter your deployment scenario, but is especially true if your server is facing the public internet.
The context of this article is based on a Virtual Private Server (VPS) that is running Fedora Server 27. Adjustment for your own environment should be done accordingly.
This post will be followed by a post on configuring a SaltStack State for hardening your general Linux servers.
SSH
Securing SSH on your server is the most obvious and biggest one.
As soon as your server goes live, there are thousands of bots on the internet that will be pounding your VPS trying to get in via SSH as well as many others. You can even verify this by logging in to your VPS via SSH, and you’ll see how many tens of thousands of failed SSH login attempts there were.
You want to use Key-based Authentication and nothing else. There really is no exception to this, even if you use a private LAN.
Key-based SSH Authentication
In this example, I’ll cover two scenarios for connecting to your VPS using key-based authentication: PuTTy and via Terminal on a Linux desktop using the SSH command.
- Disable standard password authentication:
- Edit the following file:
vi /etc/ssh/sshd_config - Change the following line to:
PasswordAuthentication no - Restart SSH:
service sshd restart
- Edit the following file:
- Generate an SSH key pair:
You want to do this because the default SSH key length is only 2048 bit, where you want to have a minimum of 4096. Remember that you need to do this for every user you will use to access the server.- Enter the following to create an SSH key pair:
ssh-keygen -t rsa -b 4096 - Hit enter to save in default location with default file name.
- Enter a passphrase for your private key, and again to confirm.
- Enter the following to create an SSH key pair:
- To authenticate from your Linux desktop computer, to your VPS, you need to add your desktop computers’ public key to the /root/.ssh/authorized_keys file on your VPS (or to whichever user folder you are using to log on to your VPS).
- If you are using Linux, follow step 2 on your Linux Desktop to create a key-pair. Then add your Linux Desktops’ public key to the authorized_keys file on your VPS.
- If you are on Windows, you can use PuTTYgen to generate a key-pair to use with PuTTY.
- Configure PuTTY to use your Desktops’ private key, after you add its public key to the authorized_keys file on your VPS.
Checking Logs
You can check your logs to see recent successful logins, or all attempts:
last
/var/log/messages
Firewall
This one should be a no-brainer, but you’d be surprised at how many devices have firewalls that are not properly secured.
- First, take a look at what your firewall profile looks like, here’s an example pictured below after entering the following command:
firewall-cmd --list-all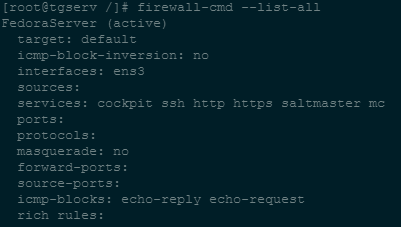
- This server happens to be a web server, Salt-Master, and Minecraft server. As you can see, the appropriate ports are open.
- I am also blocking echo replies and requests, which is not meant to directly increase security, but to aide in making the server less discoverable via pings.
- Verify the only ports and services allowed through your firewall are those services your server is actually providing.
- For example, if your server is only KVM host, you would generally only need your SSH and Cockpit services or ports open.
Allowing a Service or Port
- Enter the following command to allow the Cockpit service rule:
firewall-cmd --add-service cockpit --permanent - Enter the following command to all the common https port:
firewall-cmd --add-port 443/tcp --permanent - Reload:
firewall-cmd --reload
Removing a Service or Port
- To remove the Cockpit firewall rule:
firewall-cmd --remove-service cockpit --permanent - To remove the common https port:
firewall-cmd --remove-port 443/tcp --permanent - Reload:
firewall-cmd --reload
Updates
This should also be a no-brainer, however, just look at the news these past few years and you’ll clearly see what happens when you don’t keep your OS, drivers, firmware, and software up to date.
Bottom line: KEEP EVERYTHING UPDATED!
I like to use a tool called DNF Automatic. There are quite a few configurations, and it will of course depend on your environment, but for this post I’ll go over how to automatically check for and install any available update every 6 hours.
- Install DNF Automatic:
dnf install dnf-automatic -y
** This post in incomplete still in-progress **
Hi Tim,
I tried to use ReaR and my config is as follow :
OUTPUT=ISO
OUTPUT_URL=’nfs://xxx
BACKUP=NETFS
BACKUP_URL=’nfs://xxx
GRUB_Rescue=y
GRUB_RESCUE_PASSWORD=”xxx”
But when I try to recover in another environment, it tries to connect back to the NFS. How do make it not try to find the NFS back?
Thanks